Easy whole wheat bread is about to become your new obsession, and I’m here for it!
Hey Cooking Buddies! Today we’re making the most amazing easy whole wheat bread that’s going to make your kitchen smell incredible and have your family asking “Did you really make this from scratch?!”

This easy healthy whole wheat bread recipe is pure magic – it’s soft, fluffy, and tastes nothing like those dense, cardboard-y whole wheat loaves you might remember. I’ve been working on this recipe for years, and it produces perfect results every time.
Table of Contents
Why You’ll Fall in Love with Easy whole wheat bread Recipe:
- Takes just 20 minutes of actual hands-on time
- Uses simple ingredients you probably already have
- All you need are your hands and a little love—no expensive equipment!
- Perfect for beginners who think bread-making is scary
- Way healthier than store-bought, but tastes even better
The best part? This healthy whole wheat bread recipe is remarkably easy-going. You will succeed even if you have never made this easy whole wheat bread before!

Easy Whole Wheat Bread
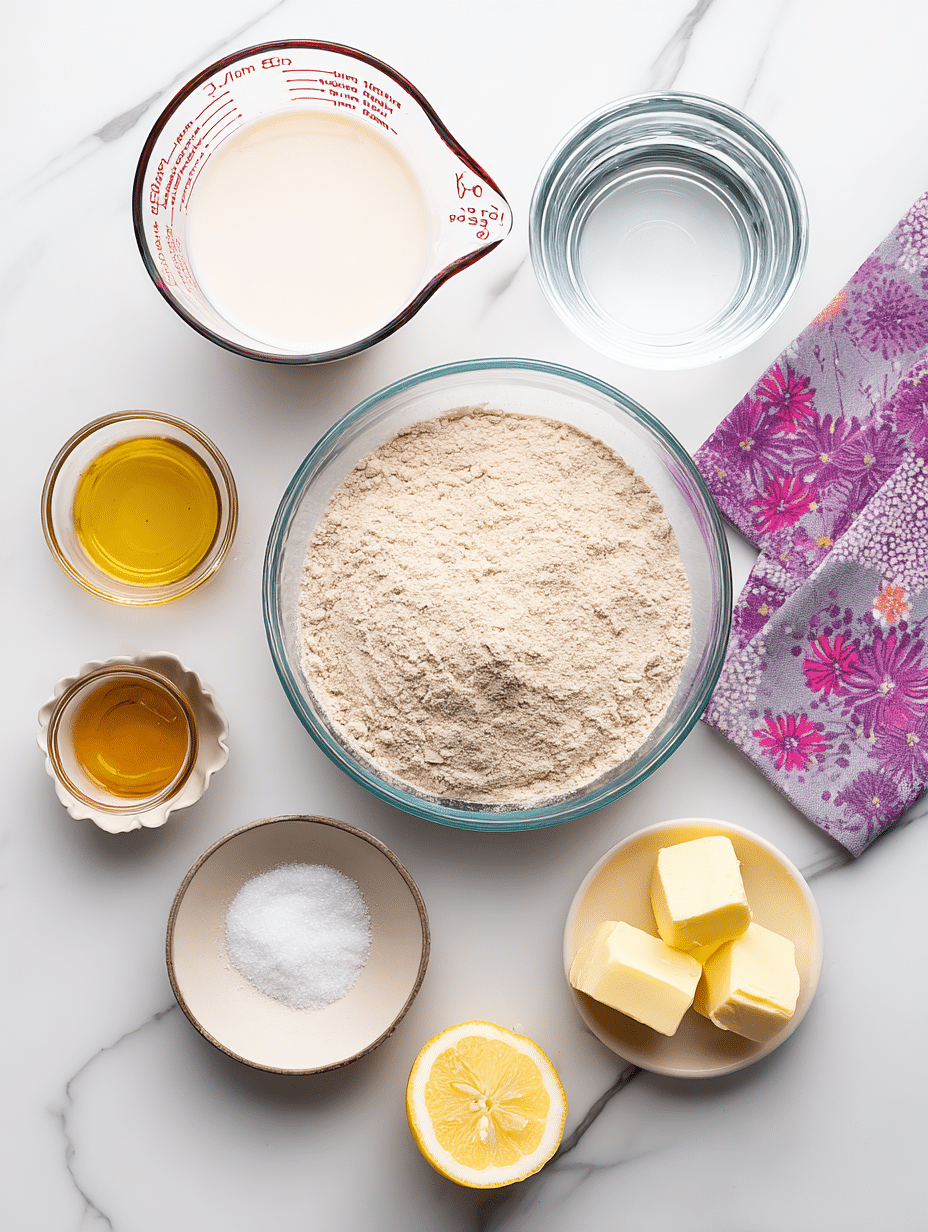
Ingredients
For the Starter Mixture:
- 1 cup warm water about baby bath temperature
- 1/3 cup warm whole milk
- 2¼ teaspoons active dry yeast 1 standard packet
- 2 cups whole wheat flour
For Building the Dough:
- 3 tablespoons pure honey
- 3 tablespoons soft butter
- 1 teaspoon fresh lemon juice or white vinegar
- 1⅓ cups additional whole wheat flour plus more as needed
- 1¼ teaspoons sea salt or table salt
Optional Topping:
- 1 egg white beaten
- 1 tablespoon rolled oats
Instructions
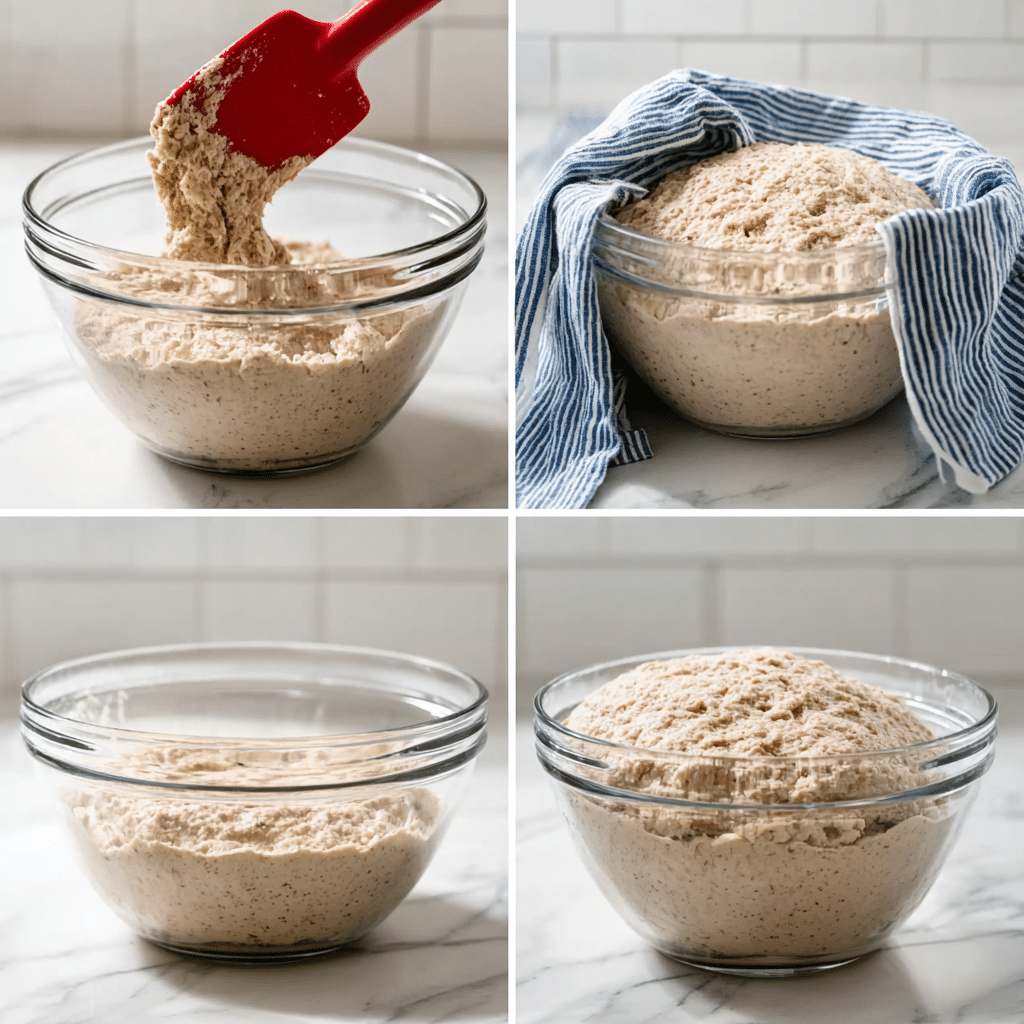
- Create the Starter: In a large bowl, whisk together warm water, milk, and yeast. Add 2 cups whole wheat flour and mix until combined. Cover and let rise for 30 minutes until puffy and bubbly.
- Build the Dough: Add honey, butter, and lemon juice to the starter. Gradually mix in the remaining flour and salt until the dough pulls away from the bowl.
- Knead the Dough: Transfer to a floured surface. Knead for 8–10 minutes until smooth and elastic, adding flour as needed if sticky.
- First Rise: Place dough in a greased bowl, cover, and let rise in a warm spot for 1 hour, or until doubled.
- Shape the Loaf: Punch down dough and shape into a rectangle. Roll tightly from the short end to form a log. Seal edges and place seam-side down in a greased 9×5″ loaf pan.
- Final Rise & Topping: Cover and let rise for 45 minutes until the dough crowns above the pan. Preheat oven to 375°F. Brush with egg white and sprinkle with oats, if using.
- Bake: Bake for 35–40 minutes until golden brown. Tap the bottom — it should sound hollow. Let rest in pan 10 minutes, then cool on a wire rack for at least 30 minutes before slicing.
Notes
Nutrition
What Makes This Healthy Whole Wheat Bread Special
Here’s the deal – this healthy whole wheat bread is nothing like those dense, heavy loaves you might be used to!
Why This Recipe is Different:
- It’s actually SOFT and fluffy (I promise!)
- Tastes amazing, not “health food-y”
- Uses a simple trick that makes everything easier
- Perfect for beginners who think bread is scary
The secret? We’re making what’s called a “sponge” first. Don’t worry – it’s just a fancy name for giving our yeast a little head start! Think of it like letting your yeast wake up and get excited before we add everything else.
Plus, the honey makes it taste incredible while keeping it healthy. Win-win!
Easy Whole Wheat Bread Ingredients
For the Starter Mixture
- 1 cup warm water (about baby bath temperature)
- 1/3 cup warm whole milk (same comfy temperature)
- 2¼ tablespoons of active dry yeast (one normal packet’s worth)
- 2 cups whole wheat flour (gently spooned into your measuring cup)
For Building the Dough
- 3 tablespoons pure honey (this makes it taste incredible!)
- 3 tablespoons soft butter (leave it out for about an hour)
- 1 teaspoon of bright, zesty lemon juice (don’t have any? No worries – a splash of white vinegar will do the trick perfectly!)
- 1⅓ cups additional whole wheat flour (plus more as needed)
- 1¼ teaspoons sea salt or table salt
- For a pretty top: 1 egg white (beaten) + 1 tablespoon rolled oats
Quick Tips Before We Start:
- Everything should be at cozy room temperature – it mixes so much better!
- Your liquids should feel like a comfortable bath temperature, not hot enough to sting
- Don’t have a thermometer? No worries – just aim for “pleasantly warm”
Easy Whole Wheat Bread Instructions
Alright friends, this is where we make the most delicious, simple whole wheat bread using basic ingredients! Are you new to baking bread? No worries, you’re covered by this recipe!
Step 1: Create Your Bubbly Starter
Find the largest mixing bowl you’ve got (you know, the one that actually gives you room to work!) and toss in your warm water, warm milk, and yeast all together. Give it a gentle whisk – you’ll see little bubbles forming, which is EXACTLY what we want!
Mix in the 2 cups of whole wheat flour until all ingredients are combined. It’s going to look shaggy and rough – totally normal! Take a fresh kitchen towel and gently lay it over your dough – think of it like giving your dough a soft blanket for its rest time! Here’s where the magic happens during the rise – time to sit back and let the dough do its thing!
Step 2: Build Your Amazing Dough
Time to add the good stuff! Pour in your honey, add that soft butter, and squeeze in the lemon juice. Mix it all into your bubbly starter.
Gradually sprinkle in your remaining flour and salt. Start with about 1 cup of flour, mix it up, then keep adding bit by bit until the sides of the bowl are mostly clear of dough.
Step 3: Time to Roll Up Those Sleeves!
Place the dough onto a surface lightly dusted with flour. Now comes the best part – kneading! Use the heel of your hand to push the dough forward, fold it back toward you, rotate it 90 degrees, and continue the process.
Keep this rhythm going for about 8-10 minutes. I like to put on my favorite playlist! You’ll know you’re done when the dough becomes smooth and bounces back when you poke it.
Feeling stuck? If it’s too sticky, dust with a tiny bit more flour. If it feels stiff, wet your hands and keep going. You’ve totally got this!
Step 4: Rise Time Magic
Plop your beautiful dough into a greased bowl, cover it up, and let it chill in a warm spot for about an hour until it doubles in size.
This is the perfect time to start prepping something else delicious like my Oatmeal Chia Seed Cookies for later!
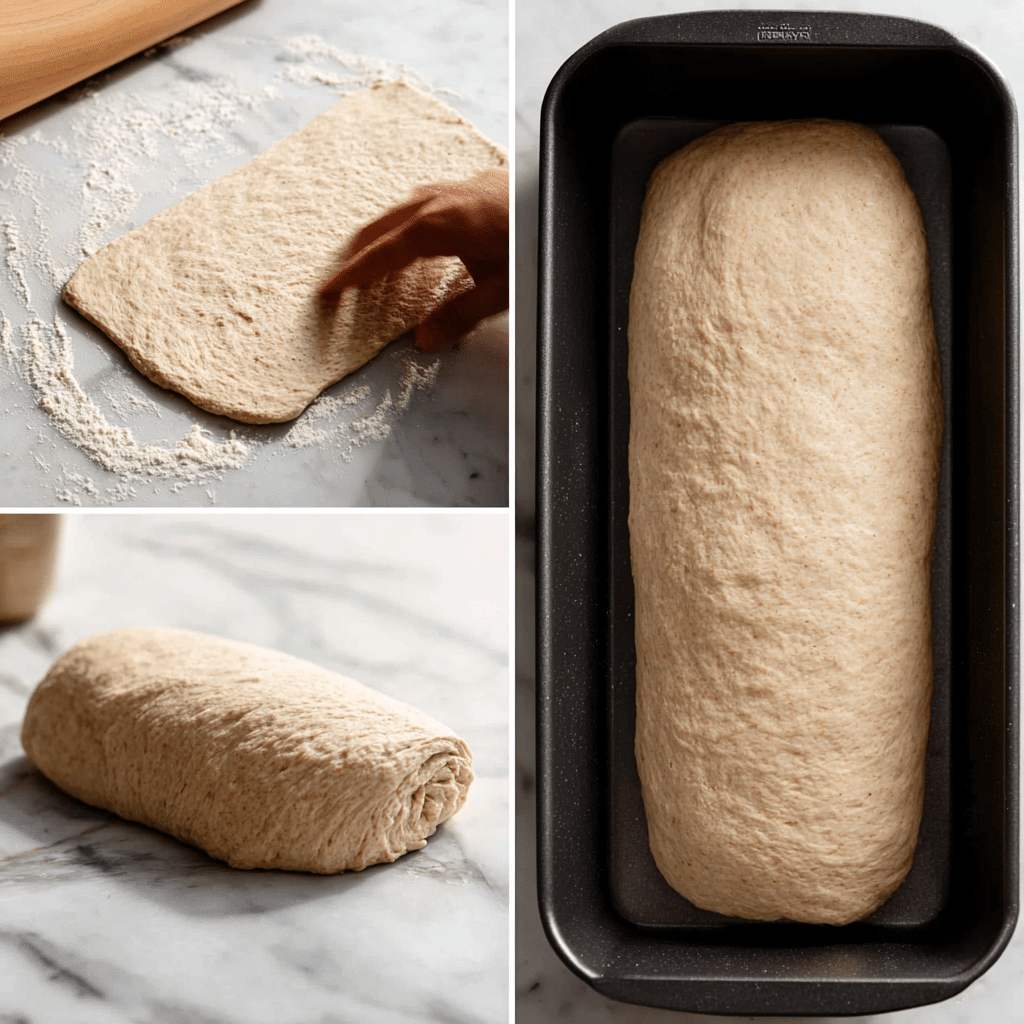
Step 5: Shape Your Gorgeous Loaf
Once your dough has puffed up to twice its original size, it’s time to give it a little love tap! Just use your fist to gently press down and let all that air escape – think of it like deflating a balloon, but way more satisfying!
Beginning from the short edge, roll the dough firmly into a tight log. After sealing the edges with a pinch, place them seam-side down in a 9 x 5-inch loaf pan that has been oiled.
Do you want that gorgeous oat garnish? Top with oats after brushing the surface with beaten egg white. How lovely!
Step 6: Final Rise and Bake to Perfection
Cover your shaped loaf and let it rise again for about 45 minutes until it puffs up nicely above the rim of your pan. Preheat your oven to 375°F.
Bake for 35 to 40 minutes, or until the top is gorgeously golden brown. Want to test if it’s done? Tap the bottom – it should sound hollow!
After ten minutes of resting in the pan, move it to a cooling rack. Try to resist slicing for at least 30 minutes – your patience will be rewarded with perfect slices!
Pro Tips for Perfect Results
Temperature Tricks That Work:
- Your kitchen temperature totally affects rising time
- Try setting the bowl on top of your refrigerator during the winter.
- Water should feel like a nice warm bath, not hot tub hot!
How to Know When It’s Done:
- A properly baked loaf will produce a hollow sound when you tap its bottom.
- Internal temp should be around 200°F if you have a thermometer
- The crust should be gorgeous golden brown
Quick Troubleshooting Guide
My Bread Didn’t Rise:
- Check your yeast expiration date
- The yeast may have been damaged due to excessively warm water.
- Too cold environment for rising
Dense Bread Solutions:
- You might have added too much flour (measure by spooning!)
- Under-kneaded dough (give it more time next time)
- Not enough rising time
Remember, even “imperfect” homemade bread tastes a million times better than store-bought!

Perfect Pairings for Your Fresh Bread
Now that you’ve mastered this easy whole wheat bread recipe, you’ll want to enjoy it with other healthy favorites! Try it toasted with homemade jam, or make it the star of your morning routine.
If you’re loving this wholesome vibe, you absolutely need to try my Healthy Flapjack Recipe – it’s another crowd-pleaser that uses simple, good-for-you ingredients. And for those busy mornings, my Bircher Muesli is perfect for meal prep and pairs beautifully with a slice of this fresh bread!
Remember, friends – baking is supposed to be fun, not stressful! Every loaf is a learning experience, and even the “imperfect” ones taste incredible fresh out of the oven. Happy baking!
Frequently Asked Questions
Can I make this bread without a stand mixer?
Absolutely! Making this easy homemade whole wheat bread recipe by hand is the goal. The kneading is actually quite therapeutic!
How long does it last?
Your fresh loaf will stay perfect for 3-4 days wrapped in plastic wrap. For longer storage, slice and freeze for up to 3 months.
Can I substitute the honey?
Sure! Maple syrup, agave nectar, or even regular sugar can be used as sweeteners. Liquid sweeteners work best for moisture and flavor.
Why is my bread dense compared to store-bought?
Healthy whole wheat bread is naturally denser than white bread because of the fiber. But this recipe should still be soft and fluffy! Avoid using too much flour and allow sufficient time for proper rising.